
Installing a ceiling fan is a practical way to improve airflow, comfort, and lighting in your home. If you are replacing an existing light fixture or old fan, a basic ceiling fan installation can often be completed as a DIY project with the right tools and safety precautions.
This guide explains how to install a ceiling fan step by step, including what to check before installation, what tools you need, basic ceiling fan wiring, and when it is safer to hire a professional electrician.
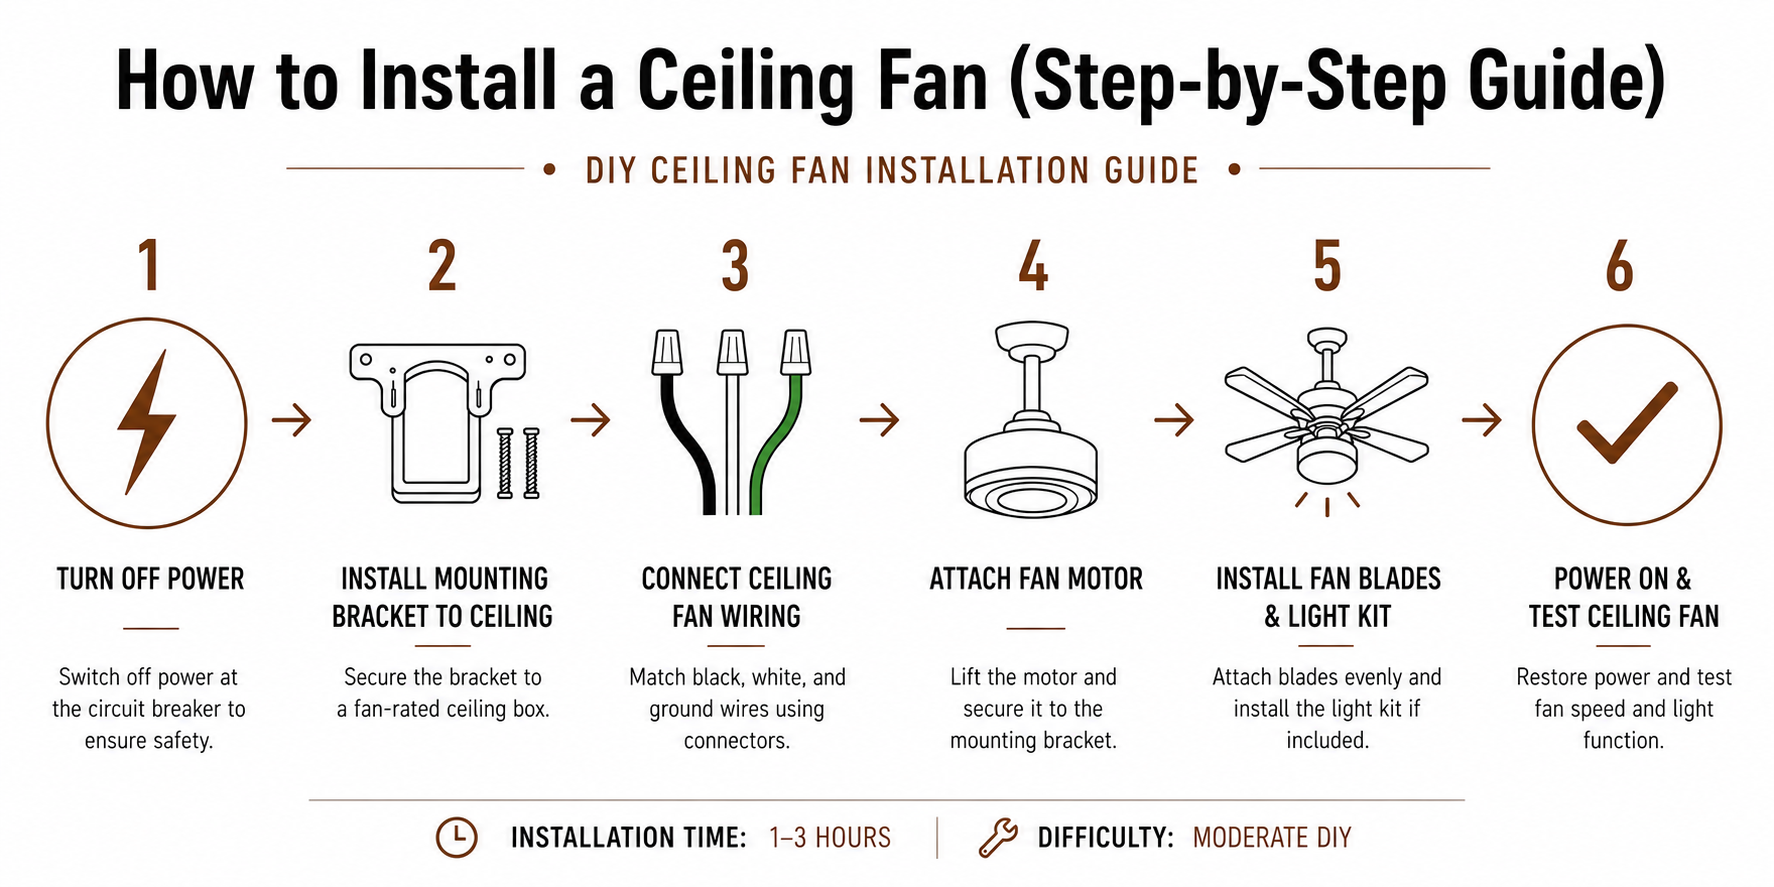
To install a ceiling fan, turn off power at the breaker, confirm the ceiling box is fan-rated, install the mounting bracket, connect the wiring, attach the fan motor, install the blades and light kit, then restore power and test the fan. Most basic installations take about 1–3 hours.
Prefer watching the process? You can also view our installation videos here:
Before starting any ceiling fan installation, make sure the location is safe and suitable for a fan. Ceiling fans are heavier than most light fixtures, so the electrical box and ceiling structure must be strong enough to support the fan.
Safety Note: Do not install a ceiling fan on a standard light fixture box unless it is rated for fan support. If the wiring, ceiling box, or ceiling structure is unclear, hire a qualified electrician. If you are unsure about electrical connections or local building codes, always consult a licensed electrician.
Turn off power at the circuit breaker. Do not rely only on the wall switch. Use a voltage tester to confirm the wires are not live before touching them.
If you are replacing a light fixture or old ceiling fan, remove the fixture cover, disconnect the wires, and carefully take down the old unit.
Inspect the ceiling box before mounting the fan. It should be securely installed and rated for ceiling fan support. If it is loose or only designed for a light fixture, replace it before continuing.
Attach the mounting bracket to the ceiling box using the provided screws. Make sure the bracket is tight and level before attaching the fan motor.
Follow the manufacturer instructions to prepare the fan motor. For a flush mount ceiling fan, the motor usually sits close to the ceiling. For a downrod fan, feed the wires through the downrod before attaching it.
Connect the fan wires to the house wires according to the manual. In many standard installations, black connects to black, white connects to white, and green or bare copper connects to ground.
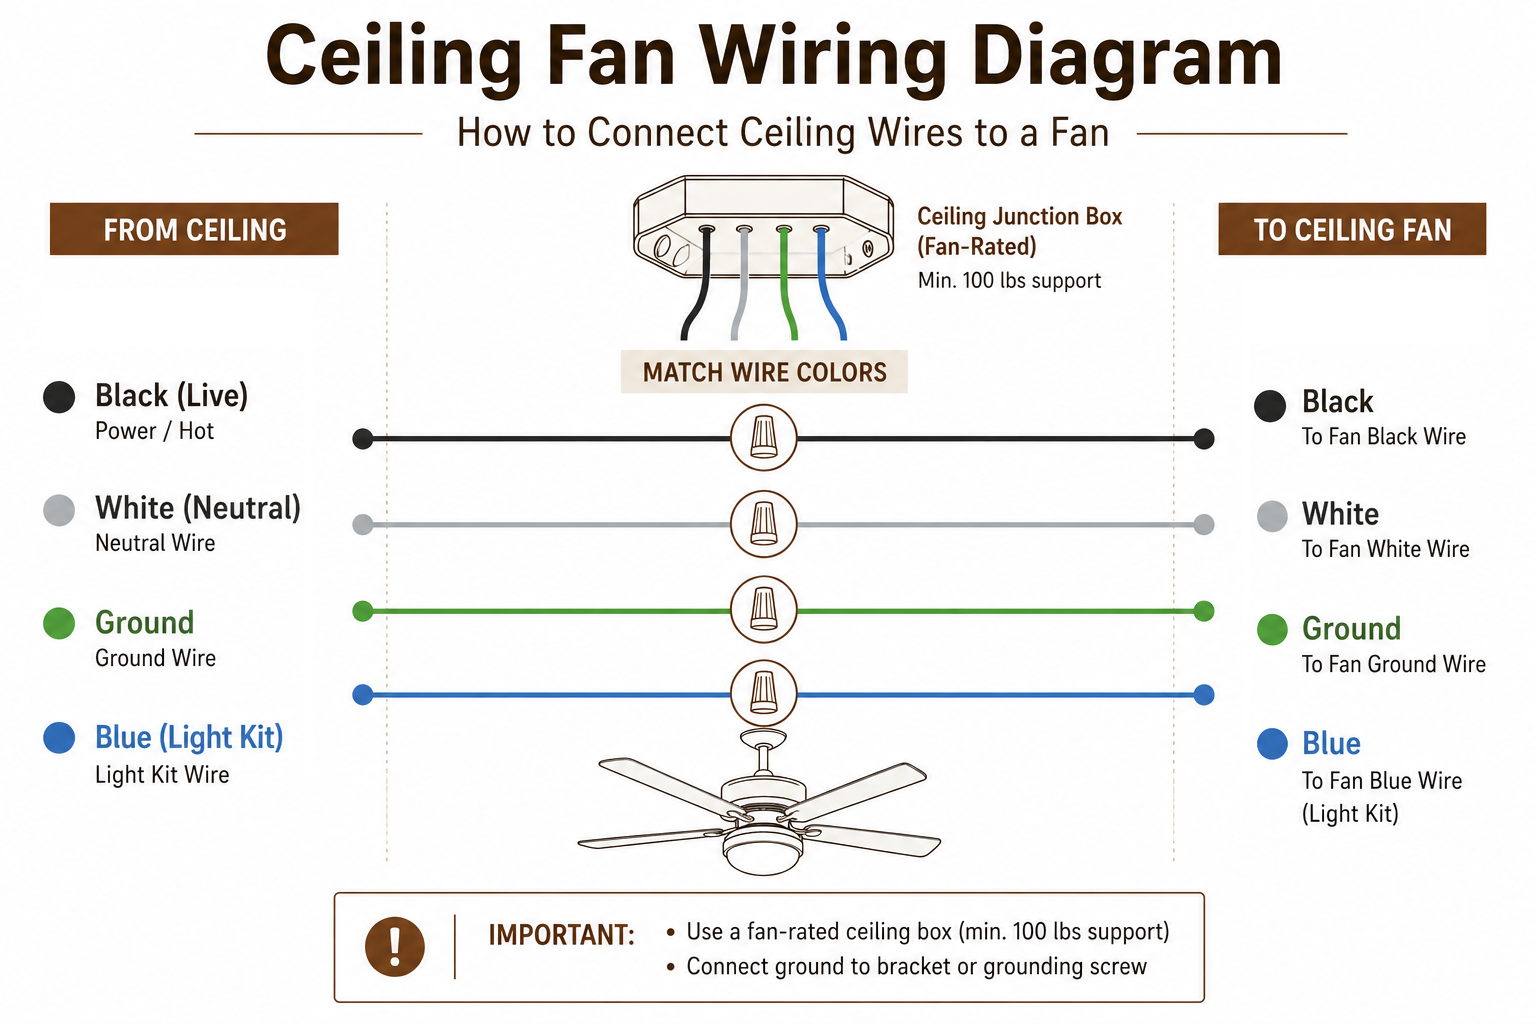
| Wire | Common Function |
|---|---|
| Black | Live / fan power |
| White | Neutral |
| Green or bare copper | Ground |
| Blue | Light kit, if included |
If your ceiling fan includes a remote receiver, place the receiver as instructed and arrange the wires neatly. Do not pinch wires or leave loose wires near moving parts.
Lift the motor into position and secure it to the mounting bracket. If the fan is heavy, ask another person to help hold the fan while you secure the motor.
Attach the fan blades using the provided screws and washers. Tighten each screw evenly to help prevent wobbling.
If you are installing a ceiling fan with light, connect the light wires and attach the LED module, glass shade, or light cover according to the product instructions.
Turn the power back on and test the fan speed, light, remote control, and direction settings. If the fan wobbles or makes unusual noise, turn it off and check the blade screws, mounting bracket, and wiring placement.
The basic installation process is similar for most ceiling fans, but the mounting style can change a few steps.
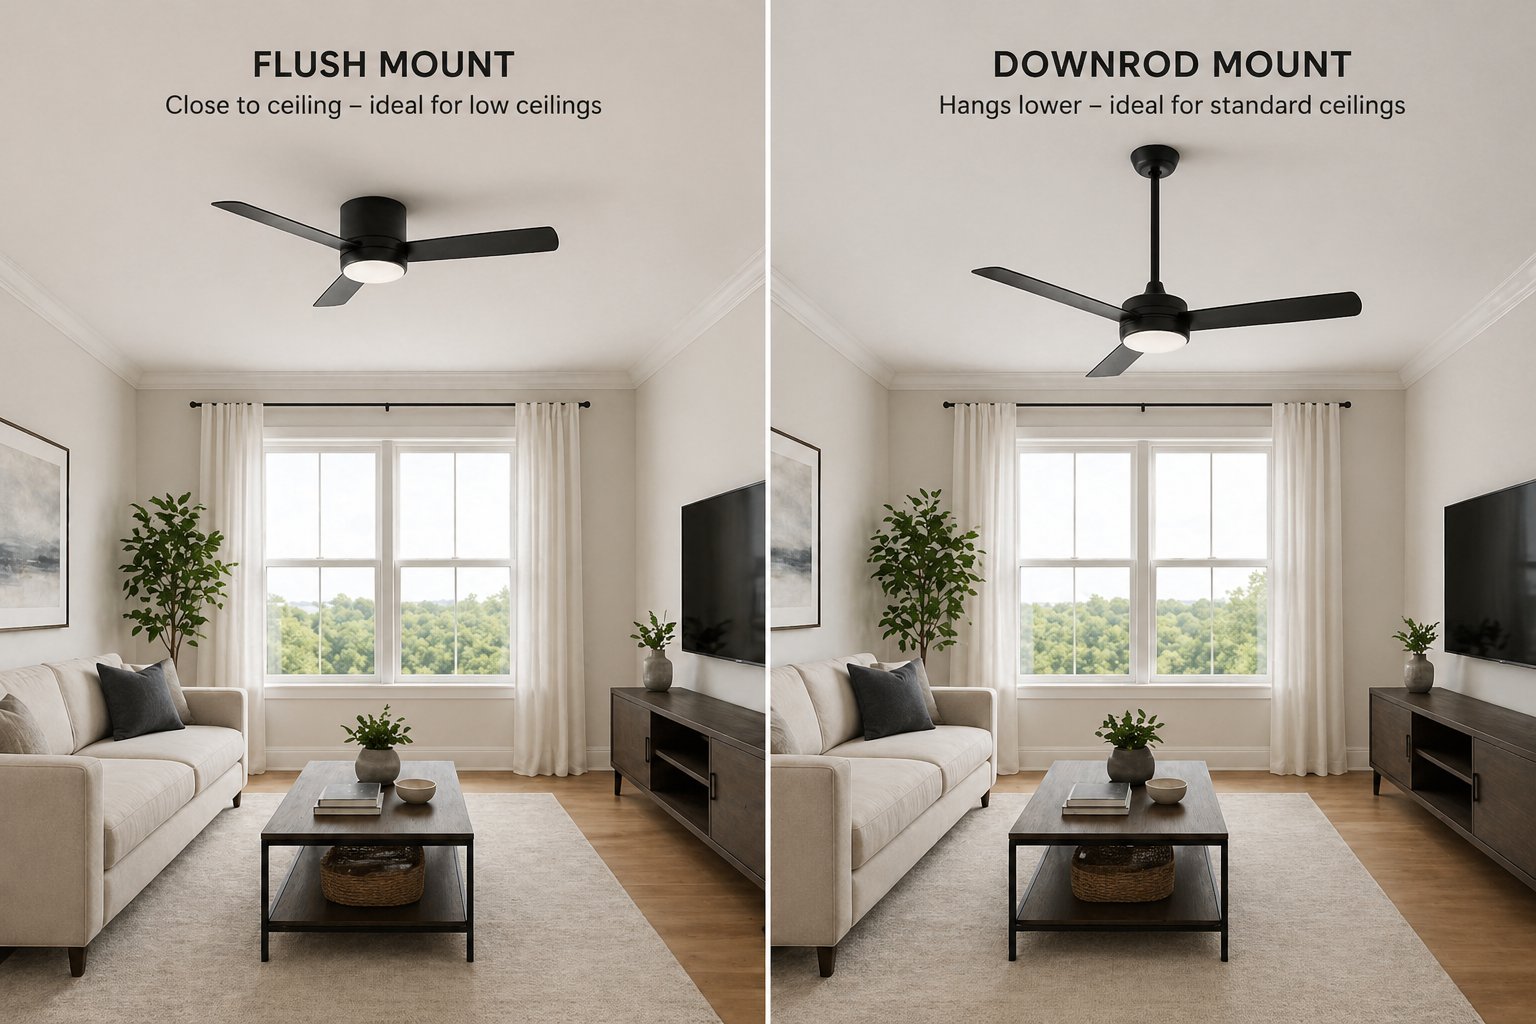
| Type | Best For | Installation Note |
|---|---|---|
| Flush Mount Ceiling Fan | Low ceilings | Installs close to the ceiling and usually does not need a long downrod. |
| Downrod Ceiling Fan | Standard or high ceilings | Uses a downrod to lower the fan for better airflow. |
| Angled Mount Ceiling Fan | Sloped ceilings | May require an angled mounting adapter. |
If you have a low ceiling, a flush mount ceiling fan with light is usually the more suitable choice because it keeps the fan closer to the ceiling while still providing airflow and lighting.
You should hire a professional electrician if there is no existing ceiling fixture, if a new ceiling box is required, if new wiring is needed, or if you are not comfortable working with electrical connections.
Professional installation may also be a better choice for high ceilings, sloped ceilings, heavy fans, or older homes with unclear wiring.
The cost of installing a ceiling fan depends on the complexity of the project. Replacing an existing fixture is usually simpler, while installing a fan in a new location may require additional wiring or a new ceiling box.
DIY installation can reduce costs, but professional installation may be a better option for high ceilings, new wiring, or more complex setups.
A detailed cost breakdown including labor, materials, and pricing factors will be covered in our upcoming guide.
If you want to check the installation process in more detail, these resources may help:
Yes, many homeowners can install a ceiling fan themselves when replacing an existing fixture. However, you should hire an electrician if new wiring, a new ceiling box, or structural support is required.
Yes, but only if the ceiling box is rated to support a ceiling fan. A standard light fixture box may not be strong enough for the weight and movement of a fan.
Yes. A ceiling fan should be installed on a fan-rated ceiling box. This helps support the weight and movement of the fan during operation.
A basic ceiling fan installation usually takes about 1–3 hours. More complex installations, such as new wiring or high ceilings, can take longer.
It is possible, but it usually requires new wiring, a new ceiling box, and possibly a wall switch. In this case, hiring a licensed electrician is recommended.
Wobbling can happen if the blades are not tightened evenly, the mounting bracket is loose, or the blades are slightly unbalanced. Turn off the fan and check all screws before using it again.
For a simple replacement, a permit is often not required. If new wiring or electrical changes are involved, check local building codes or ask a licensed electrician.
Basic ceiling fan installation can be safe for beginners when replacing an existing fixture and following instructions carefully. However, if wiring is unclear, the ceiling box is not rated for fans, or new wiring is required, hiring a licensed electrician is strongly recommended.
Ceiling fan installation is manageable for many DIY users when the existing ceiling box is fan-rated, the power is turned off, and the manufacturer instructions are followed carefully. The most important steps are safe wiring, secure mounting, and testing the fan after installation.
If you have a lower ceiling or want a cleaner look, a flush mount ceiling fan with light can be a practical option for bedrooms, living rooms, and other indoor spaces.
Choosing the right ceiling fan can make installation easier and improve performance.
Browse our collection of modern ceiling fans designed for simple installation, quiet airflow, and reliable performance.


